简述
当一篇文章内容过多过长时,我们想要快速了解通篇内容,以及能够快速定位到自己所关注的点,那么文章的索引是非常重要的一个模块。
Word 相信大家都写过吧,它会根据所写的大标题,二级标题,三级标题等去自动生成一个索引目录。就比如说非常长的论文,必定会有对应的目录索引。那么如果我们要把这么长的内容都展示在网页上,是不是最好也要有一个右侧的目录索引。
当然也是因为运营小姐姐们,最近提了很多协议类的需求。如果前端手撸代码的话,都是些不厌其烦的复制黏贴,搬砖的活。作为一个有理想的 coder,我抽空写了个自动生成目录索引的脚本。那么我就只要把 Word 转 Html,然后插入脚本,就可以发布上线了。
git 仓库: https://github.com/beezenD/doc-menu
npm: https://www.npmjs.com/package/doc-menu
效果
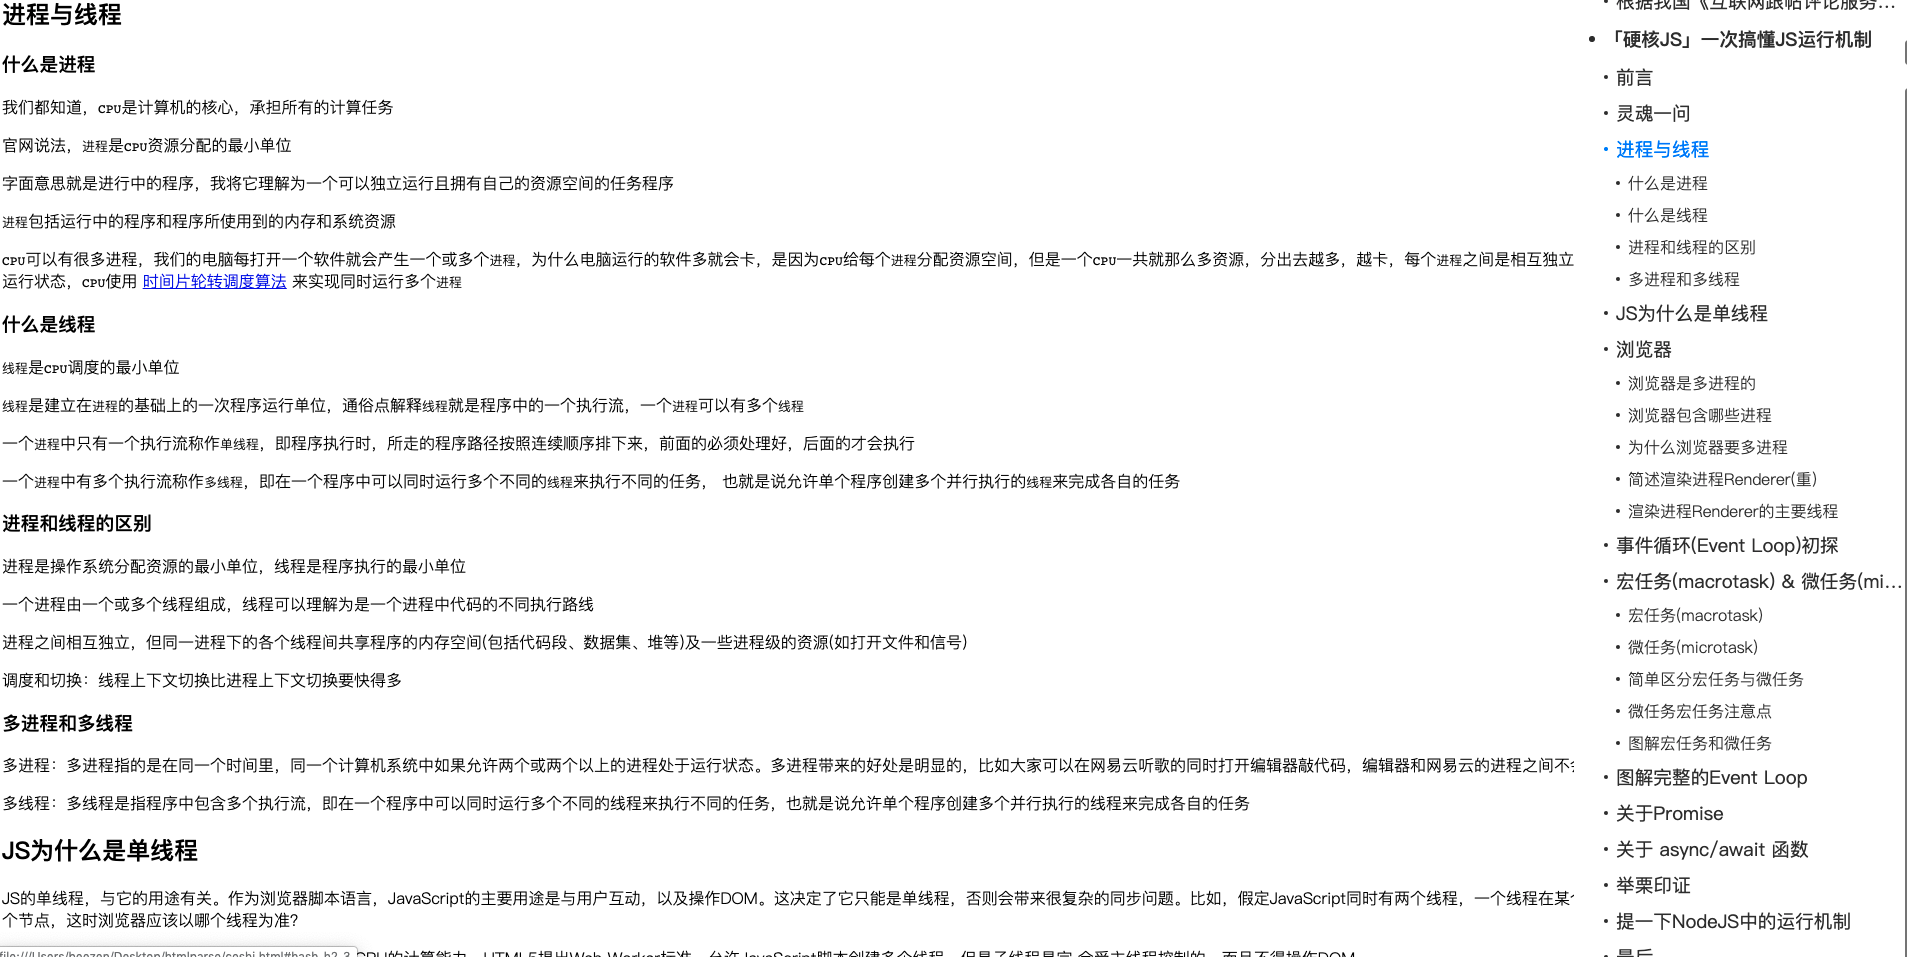
随便网上找了个文章,插入代码后生成右侧目录索引,效果如下图所示:
使用方法
在页面最顶端引入css和js,注意:等页面内容加载完成后,执行DOC_MENU.init()初始化后,立即就会在页面右侧出现索引列表。
资源引用两种方式:1.直接引用在线 cdn 地址。2.将编译后的源码目录 lib, 拷贝到项目中。具体如下:
1
2
3
4
5
6
7
8
9
10
11
12
13
14
15
16
17
18
| <html>
<head>
<link
rel="stylesheet"
href="https://unpkg.com/doc-menu@0.0.1/lib/doc-menu.css"
/>
<script src="https://unpkg.com/doc-menu@0.0.1/lib/doc-menu.js"></script>
</head>
<body>
<script>
DOC_MENU.init();
</script>
</body>
</html>
|
代码解析
原理:js 自动获取 HTML 中的 h1|h2|h3 标签中的信息,生成对应的信息列表。(需要完全自定义的可下载源码直接修改哦)
1.DOC_MENU.init 初始化函数
主要提取网页为字符串,通过正则匹配对应标签的所有内容,然后为每一个匹配标签生成唯一 hash_id,并同时插入到网页中,为了渲染目录方便,同时也把标签数组解析为树状的数据结构。
1
2
3
4
5
6
7
8
9
10
11
12
13
14
15
16
17
18
19
20
21
22
23
24
25
26
27
28
29
30
31
32
33
34
35
36
37
38
39
40
41
42
43
44
45
46
47
48
49
50
51
52
53
54
55
56
57
58
59
60
61
62
63
64
65
66
67
68
69
70
71
| window.DOC_MENU = window.DOC_MENU || {};
DOC_MENU.title = "目录";
DOC_MENU.hashPrefix = "hash";
DOC_MENU._menuList = [];
DOC_MENU._menuTreeList = [];
DOC_MENU.init = function (isRender = true) {
const htmlStr = document.documentElement.outerHTML || "";
const result = htmlStr.match(/<\s*h(1|2|3).*?>.+?<\s*\/h(1|2|3)\s*>/g);
if (result == null) {
console.log("未匹配到菜单内容");
return null;
}
let menuList = result.map((e) => {
const tag = "h" + e.match(/<\s*h(1|2|3)/)[1];
const content = e
.match(/>.*?</g)
.map((e) => e.replace(/>(.*?)</, "$1"))
.join("");
return {
tag,
content,
};
});
const h1List = menuList.filter((e) => e.tag == "h1");
const h2List = menuList.filter((e) => e.tag == "h2");
const h3List = menuList.filter((e) => e.tag == "h3");
menuList = menuList.map((e) => {
let list = e.tag == "h1" ? h1List : e.tag == "h2" ? h2List : h3List;
let index = 0;
for (let i = 0; i < list.length; i++) {
if (list[i].content == e.content) {
index = i;
break;
}
}
const hash = `${DOC_MENU.hashPrefix}_${e.tag}_${index}`;
e.hash = hash;
e.index = index;
return e;
});
menuList = menuList.map((e) => {
let node = document.getElementsByTagName(e.tag)[e.index];
if (!node) {
return e;
}
if (!node.getAttribute("id")) {
node.setAttribute("id", e.hash);
} else {
e.hash = node.getAttribute("id");
}
return e;
});
DOC_MENU._menuList = menuList.concat();
menuList = DOC_MENU.parseToTreeData(menuList);
DOC_MENU._menuTreeList = menuList;
isRender && DOC_MENU.render(menuList);
return menuList;
};
|
2.DOC_MENU.parseToTreeData 数据解析为树状结构
1
2
3
4
5
6
7
8
9
10
11
12
13
14
15
16
17
18
19
20
21
22
23
24
25
26
27
28
29
30
31
32
33
34
|
DOC_MENU.parseToTreeData = function (menuList) {
let arr = [];
menuList.map((e) => {
if (e.tag == "h1") {
arr.push(e);
} else if (e.tag == "h2") {
if (arr.length > 0) {
if (!arr[arr.length - 1].children) {
arr[arr.length - 1].children = [];
}
arr[arr.length - 1].children.push(e);
}
} else if (e.tag == "h3") {
if (arr.length > 0) {
if (arr[arr.length - 1].children) {
let h2 = arr[arr.length - 1].children;
if (!h2[h2.length - 1].children) {
h2[h2.length - 1].children = [];
}
h2[h2.length - 1].children.push(e);
}
}
}
});
return arr;
};
|
3.DOC_MENU.render 渲染函数
主要就是根据得到的 menuList 数据,渲染特定的目录结构,最后挂载到页面 body 下。
1
2
3
4
5
6
7
8
9
10
11
12
13
14
15
16
17
18
19
20
21
22
23
24
25
26
27
28
29
30
31
32
33
34
35
36
37
38
39
40
41
42
43
44
45
|
DOC_MENU.render = function (menuList) {
let renderLevel3 = function (item) {
return `<li class="d3 item"><a href="#${item.hash}" title="${item.content}">${item.content}</a></li>`;
};
let renderLevel2 = function (item) {
return `<li class="d2 item"><a href="#${item.hash}" title="${
item.content
}">${item.content}</a>
${
item.children
? `<ul class="doc_menu_leaf_list">${item.children
.map((e) => renderLevel3(e))
.join("")}</ul>`
: ""
}
</li>`;
};
let renderLevel1 = function (item) {
return `<li class="d1 item"><a href="#${item.hash}" title="${
item.content
}">${item.content}</a>
${
item.children
? `<ul class="doc_menu_sub_list">${item.children
.map((e) => renderLevel2(e))
.join("")}</ul>`
: ""
}
</li>`;
};
let listStr = `<ul class="doc_menu_list">${menuList
.map((e) => renderLevel1(e))
.join("")}</ul>`;
let str = `<div class="doc_menu_body">
<div class="doc_menu_title">${DOC_MENU.title}</div>
${listStr}</div>`;
let div = document.createElement("div");
div.setAttribute("class", "doc_menu_block");
div.innerHTML = str;
document.body.appendChild(div);
};
|
最后
自动生成文档索引的脚本确实非常简单,想要定制化效果和功能,可直接复制源码做修改。
当然如果只是想简单的生成一个目录索引,以上功能应该能够满足了。